How To Create Hanging Indent In Google Docs4 StepsWith Pictures
This Guide Shows You How To Create/Make Hanging Indent In Google Docs.(Step By Step-With Pictures)
This Is A Short Demonstration How To Create Hanging Indent In Google Docs.this Is An Essential Step Required For MLA 7 Citations.
Step 1.)First Make Sure That You Have Ruler Visible In Your Document.in The View Menu, Show Ruler Option Needs To Be Checked.if You Do Not See The Check Mark Next To It, Click On It.

Step 2.)Next, Select All the text for your works mentioned entries.

Step 3.)After Selection Of Text, Click And Drag The Inverted Triangle(On Ruler) To Move The Left Indent 1/2 Inch To The Right.see-
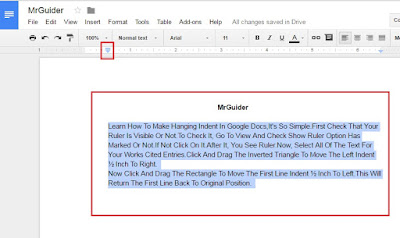

After Dragging/Moving The Left Indent To half of Inch, You See This Look-

Step 4.)Now, Click And Drag The Rectangle To Move The First Line Indent 1/2 Inch To The Left.this Will Return The First Line Back To The Original Position.(Ignore Triangle While Dragging, Only Move Rectangle That You See In Below Picture).

I Hope You Understand, Like Us On Facebook-MrGuider
Share This Post With Your Friends-
0 Response to "How To Create Hanging Indent In Google Docs4 StepsWith Pictures"
Post a Comment